Test and Production Environment Setup - Ubuntu
This page documents, how to set up Avni for Production or Test environments. Avni uses Ubuntu Linux 22.04 or upwards for production environments.
If you only want to set up Avni for local development on your own machine, then use this Local development - Ubuntu.
Important information
- The release info with build numbers is published here
- The Github organization for Avni is here - https://github.com/avniproject which has all the repositories.
This setup documentation assumes that the user knows how to install and use some of the commonly used utilities. There is enough documentation on the Internet for installing and using them. We may link these docs in some places but not always. The exact commands are indicated as this always. Please ensure you have the following software configuration already:
- Your OS user has sudo access
- curl, wget
- nvm
- (Optional) Automatically set the node version when you change your directory based on the .nvmrc file present in that directory. Place the function code as it in the file.
- Linux user with sudo access
High-Level Installation Areas
Please follow the steps mentioned below. At a high level, we will cover five broad installation areas:
- Third-party components like AWS IAM, Cognito, and S3, are needed by Avni.
- Avni Database and Server Setup.
- Deploy a specific "Implementation" / "Template".
- Install the Avni Android app on mobile/emulator.
- Deploy the Avni Admin Web app
See below for each install area.
1. Third-party components
1.1 AWS command-line tool setup
- Install the aws cli by following the instructions in their documentation
- You need to have two environment variables set up - AWS_ACCESS_KEY_ID and AWS_SECRET_ACCESS_KEY. You can use AWS's IAM service to set them up.
1.2 AWS IAM, Cognito, and S3 setup
Avni uses Cognito and S3 services from AWS. S3 service will be used by Avni only if any of the implementations use photo or video capture functionality in the field app. IAM is the identity and access management service for all AWS services (like Cognito and S3). Users are created in IAM to provide access to various services/resources/actions within AWS. Cognito is also an identity and access management service to be used by AWS customers/users to manage their application users. This can be confusing initially hence, it is important to pause and understand this well.
1.2.1 IAM User Configuration
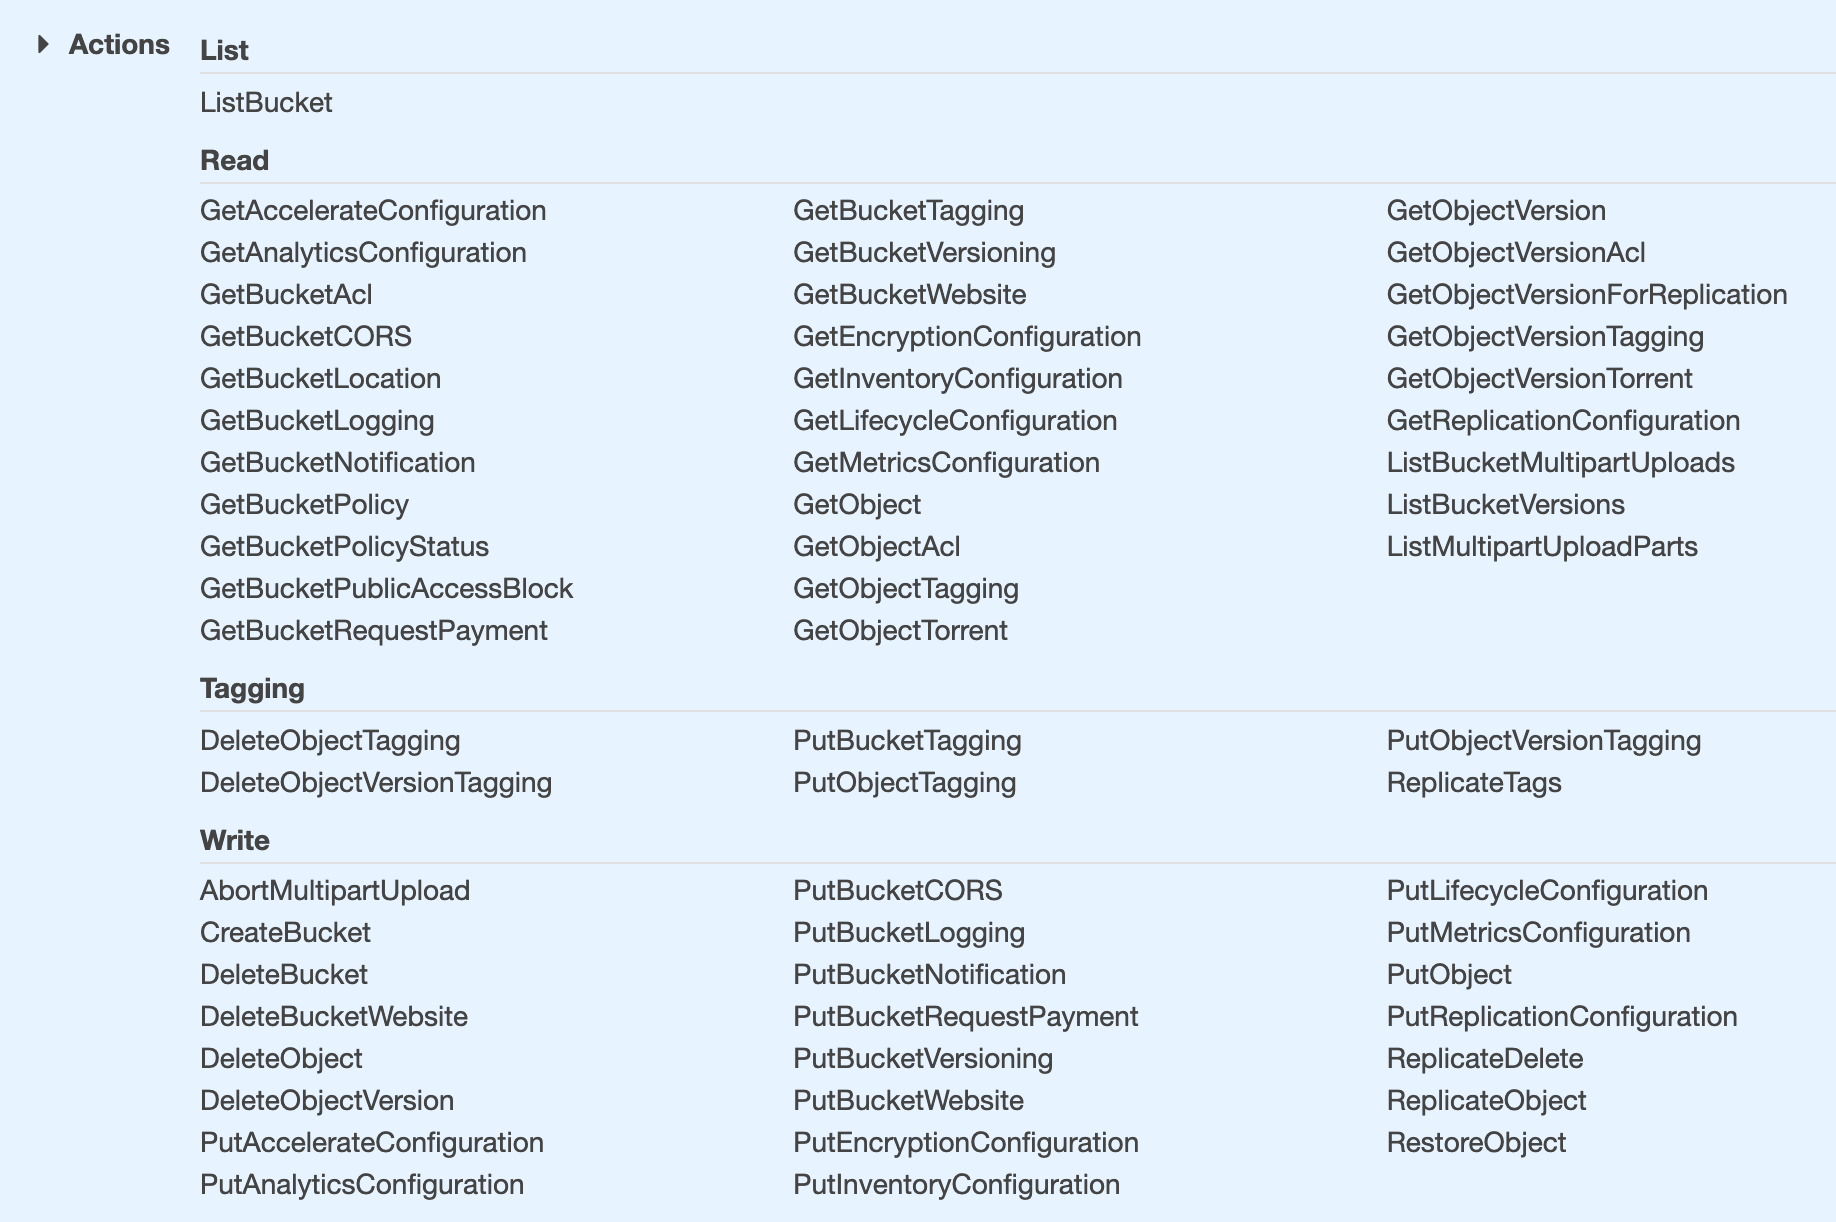
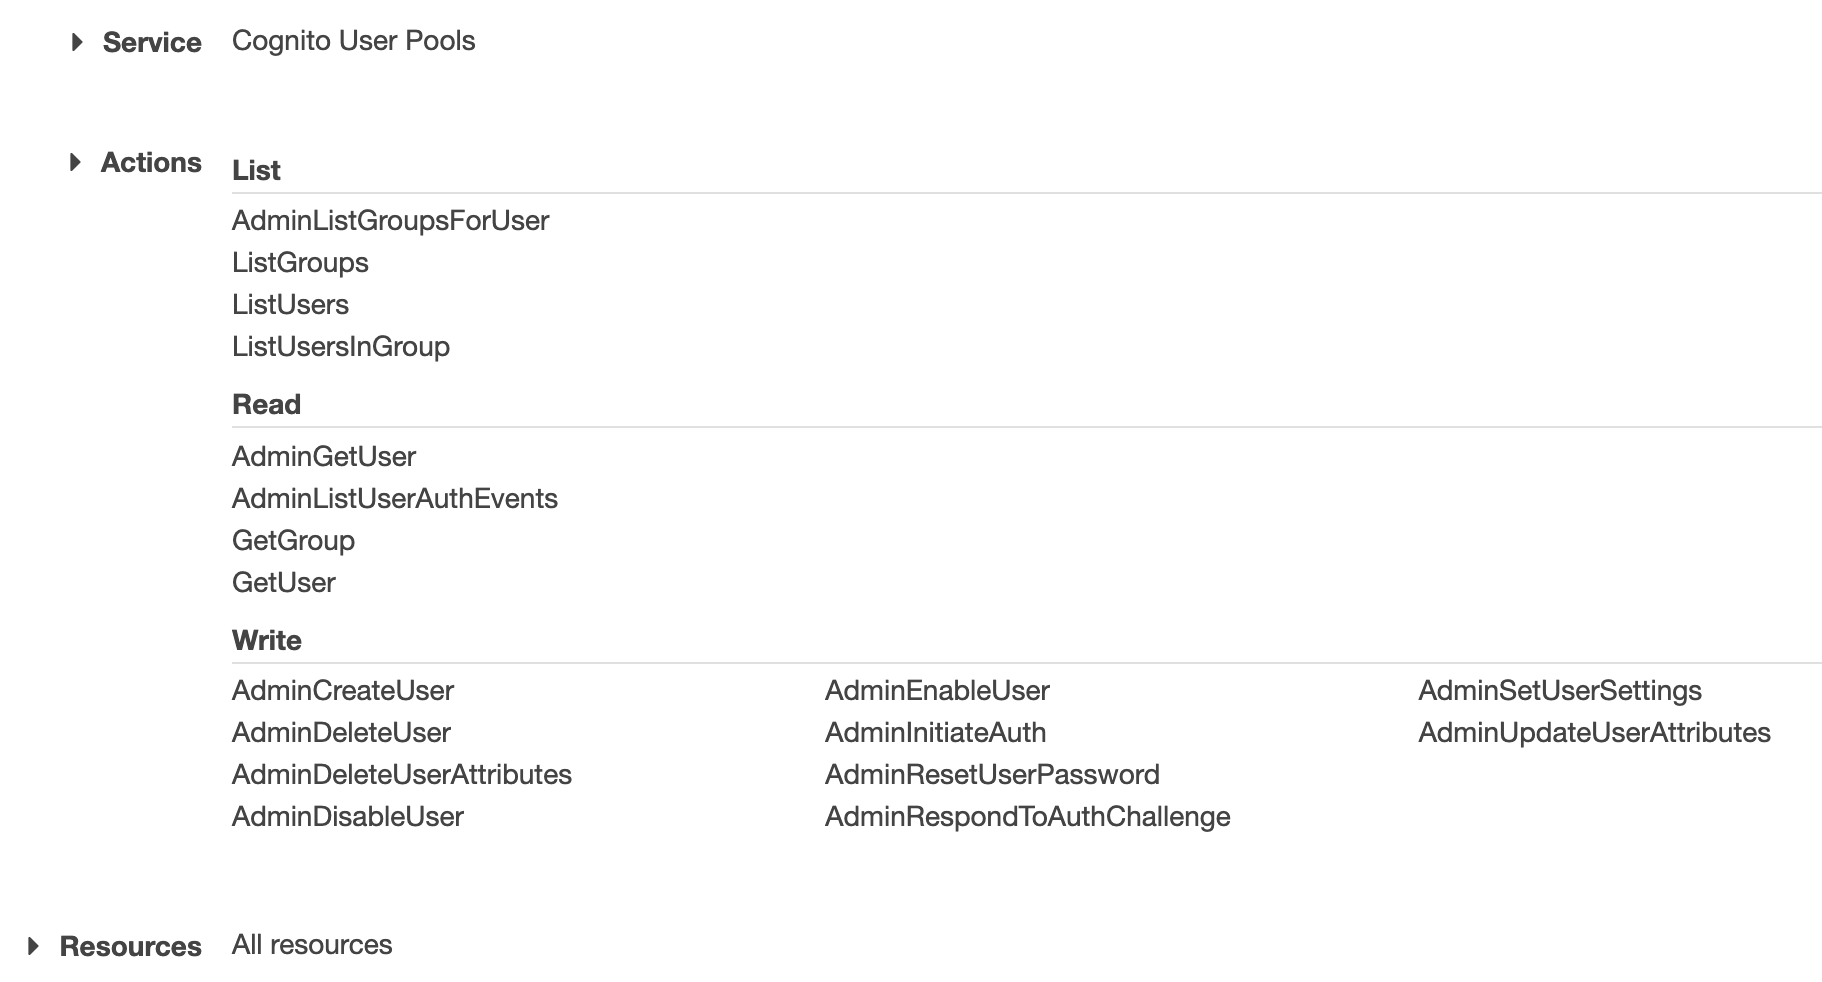
Since Cognito and S3 are secure services running within AWS - Avni has to authenticate itself before using these services. Hence, create an IAM user (if you are new to AWS then you can find IAM under services in the AWS console) which could be used by Avni to connect to Cognito and S3. For this user create a policy (inline or managed) with the following details:
- Service = S3; Actions = refer this diagram; Resources = (as per your configuration)
- Service = Cognito; Actions = refer this diagram; Resources = (to your user pools)
1.2.2 Cognito Setup
Create a user pool. We have left the settings that you may want to change as per the policies of your hosting, up to you. Only the settings which need to be made for Avni to work correctly have been specified below.
- How do you want your end-users to sign in? - Username
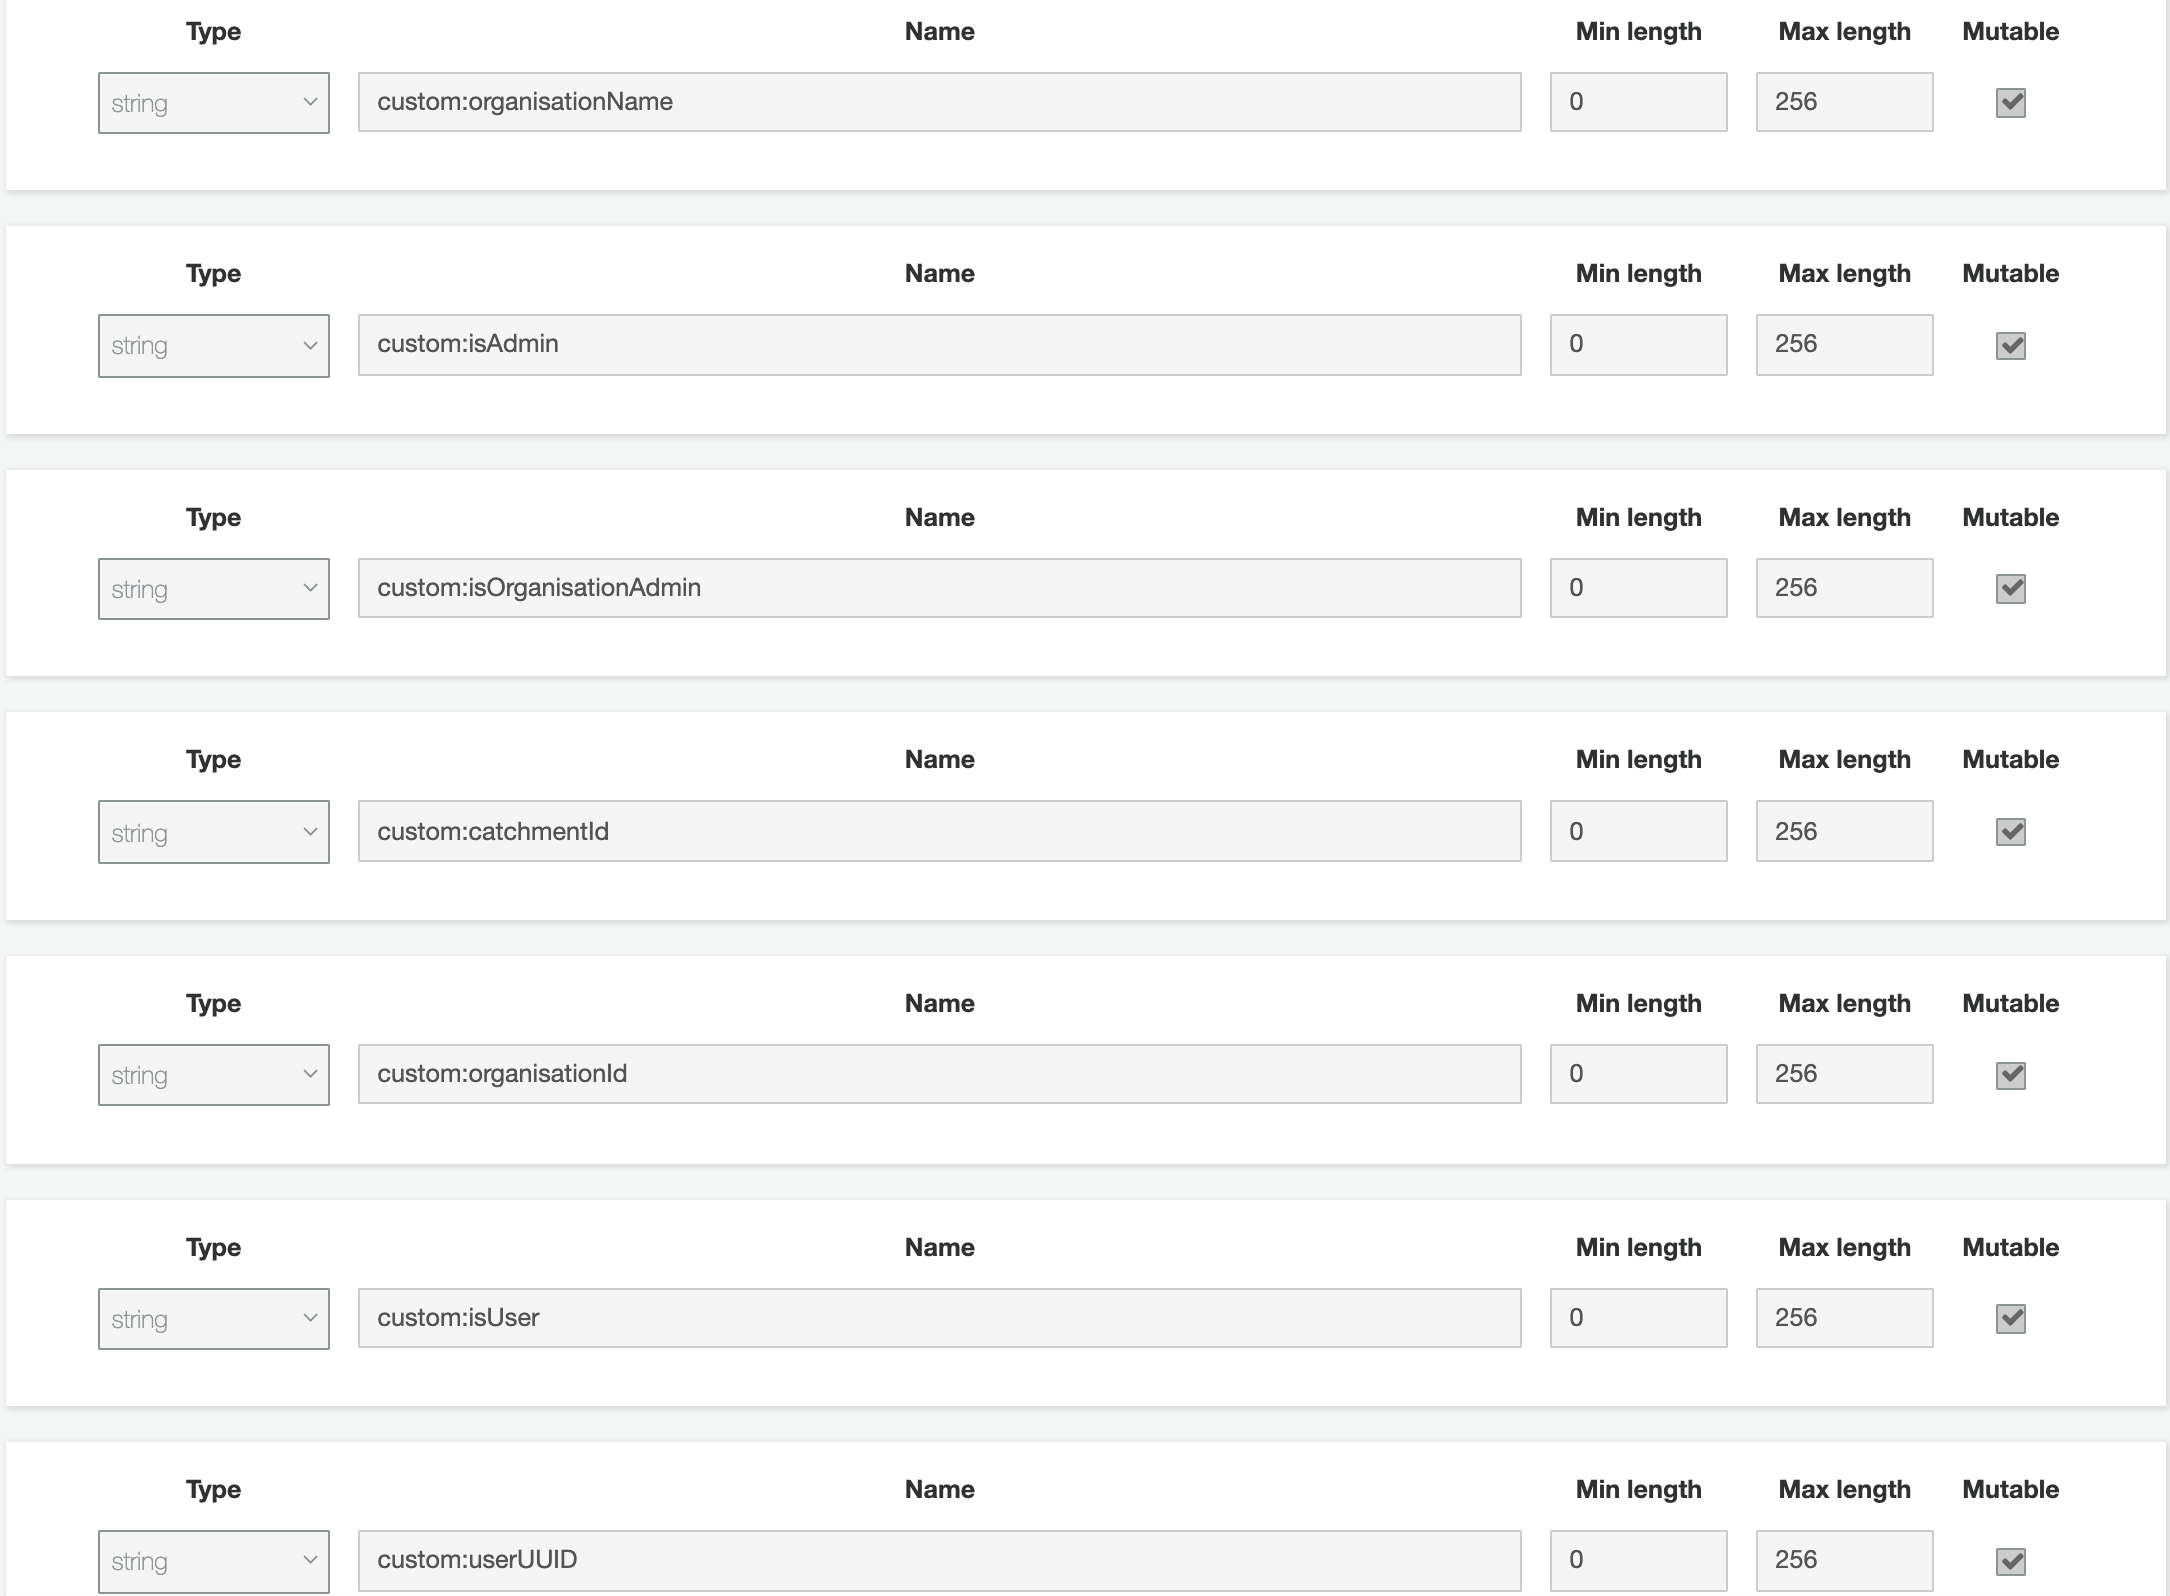
- Add custom attributes as described in this diagram. Note that you should not put custom: in front of the name as this is added automatically.
- Just check the policy tab in Cognito to understand how you need to set passwords.
- MFA and Verifications
- Recovery - using Phone if available
- Attributes to verify - Phone number
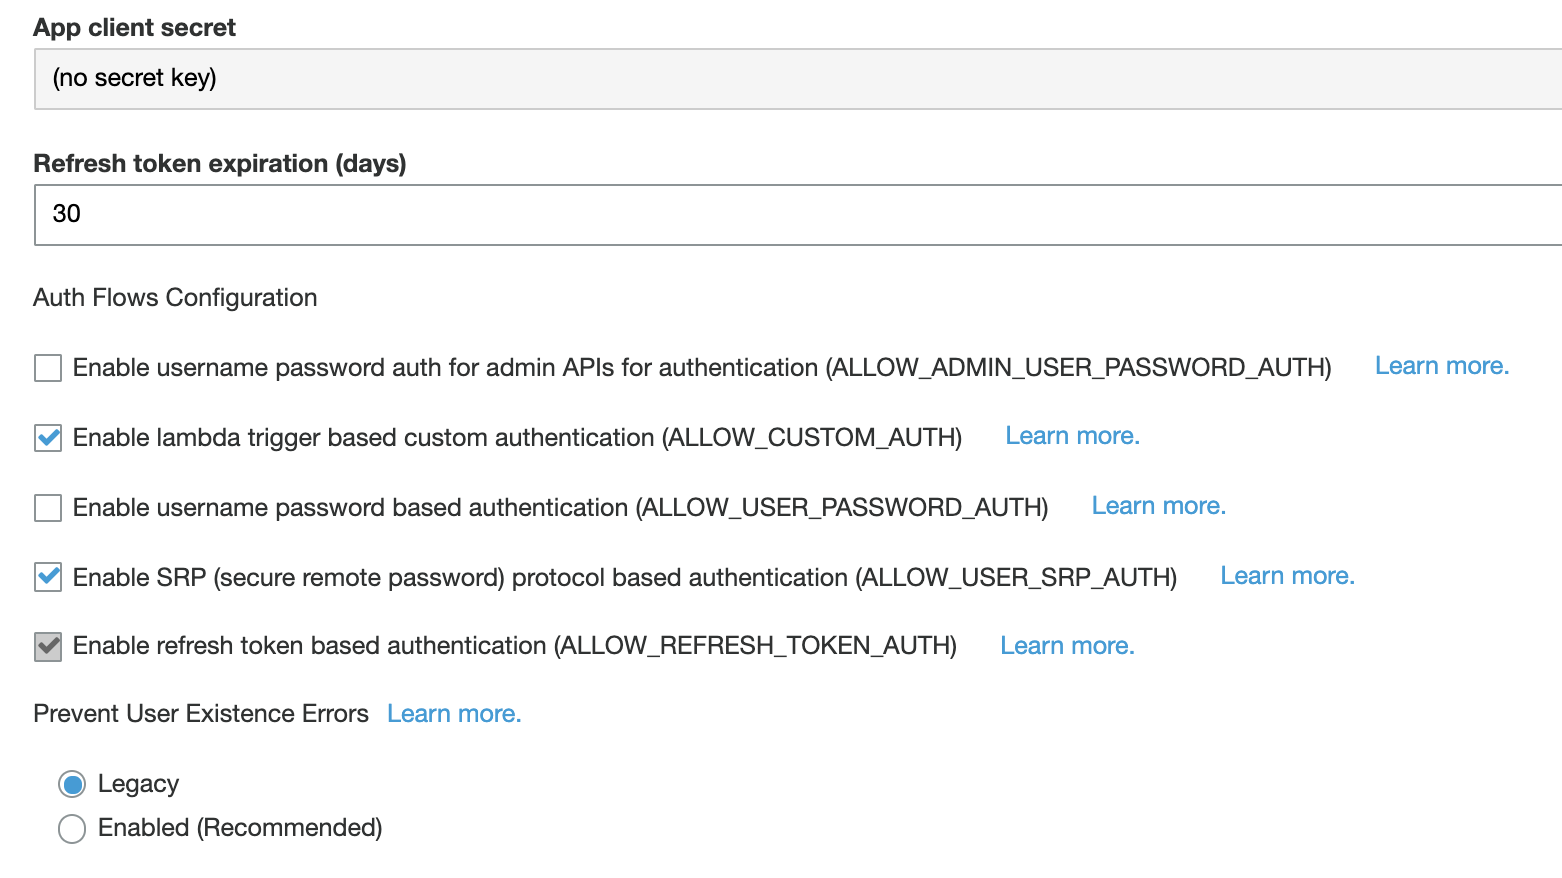
- App Clients
Create two app clients. avni-server, avni-webapp with a few changes from default settings. See the screenshot here.
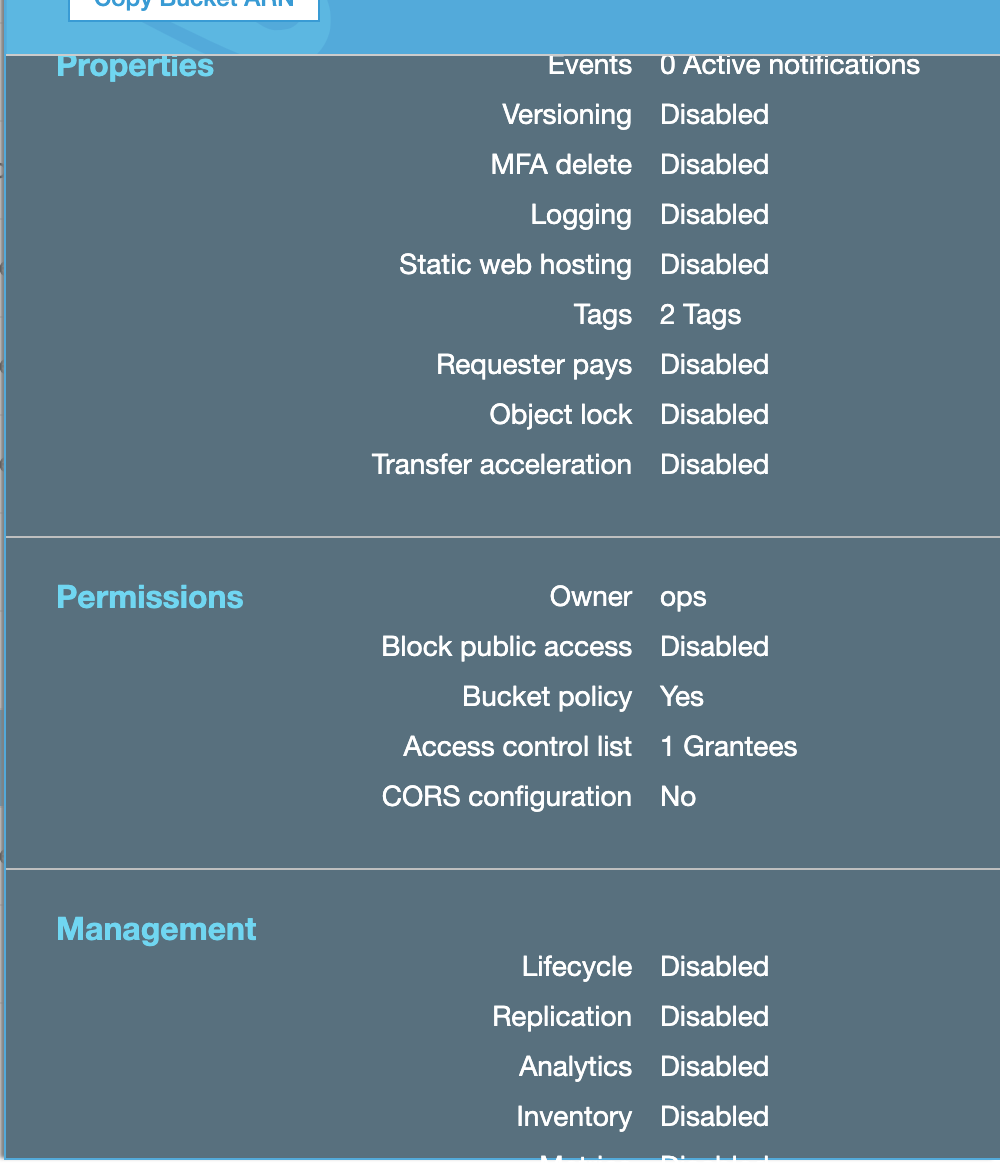
1.2.3 S3 Setup
Avni stores the images, videos, and longitudinal data export in S3.
- Create a bucket to which you will be saving all of the above files. The properties of this bucket can be seen here.
- In openchs.conf provides the bucket name you have given to the property - OPENCHS_BUCKET_NAME
1.2.4 Create Admin User
Avni is a multi-tenant system, hence this user is the administrator for all tenants (also referred to as implementation or organization elsewhere).
- Create an admin user in your user pool. For userUUID provide the value as 5fed2907-df3a-4867-aef5-c87f4c78a31a. After you have manually created the user in Cognito you can use the command aws cognito-idp admin-update-user-attributes --user-pool-id<YOUR_POOL_ID> --username admin --user-attributes Name="custom:userUUID",Value="c8381fe2-7924-4ffd-acbe-14729b3257ed"
- Set password for admin user and confirm it aws cognito-idp admin-set-user-password --user-pool-id<USER_POOL_ID> --username admin --password <PASSWORD> --permanent
2. Server-side components
2.1 PostgreSQL Database (version 12.x)
- Install postgresql-server, postgresql-contrib packages
- Initialize the database and start
- Change postgres login access from peer to trust - Edit /var/lib/pgsql/VERSION/data/pg_hba.conf. As in line 2 and 9 of this file.
- Restart postgres - sudo systemctl restart postgresql-VERSION
- Create OpenCHS database, user and install extensions
2.2 Avni Server
- Download the RPM you want to install. You can download it by replacing the build number in the https://circleci.com/gh/avniproject/avni-server/<server_build_number>#artifacts by the build server build number you got from release info page. For downloading the build expand CircleCI node in the tree. Refer to this diagram for help.
- Install from the rpm using sudo yum install <rpm-file>
- Create a file update the file /etc/openchs/openchs.conf with the contents here. The properties are explained below:
- OPENCHS_SERVER_PORT - port on which you want the server to listen on
- OPENCHS_SERVER_OPTS - change the logging properties which are self-explanatory. You can also set JVM properties.
- OPENCHS_USER_POOL - this is the id of Cognito user pool
- OPENCHS_CLIENT_ID - app client id for Cognito
- OPENCHS_MODE - should be = live
- OPENCHS_SERVER_BUGSNAG_API_KEY - the value of the bugsnag API key if you are using one
- OPENCHS_BUGSNAG_RELEASE_STAGE - the value of the bugsnag release stage properties if you are using bugsnag service
- OPENCHS_BUCKET_NAME - S3 bucket name (required if the users are using the photo, video features in the forms)
- OPENCHS_IAM_USER, OPENCHS_IAM_USER_ACCESS_KEY, OPENCHS_IAM_USER_SECRET_ACCESS_KEY = AWS IAM user details
- Start Avni Server by running the command
sudo service openchs start - Verify Avni server is running - c
url http\://<server>:<port>/concept- should give you a few concepts in the JSON response.
3. Deploy Implementation
Avni is a platform and without the deployment of an implementation onto it, it doesn't do anything. If you do not have your own implementation yet, you can clone any of the implementations from here. If you want to understand how the whole system functions (app, web app, server), it is recommended you choose the sample implementation. The sample implementation supports multiple names of environments - staging, prod, uat. You can also use multiple of these keywords if you want to deploy to multiple environments. The following documentation assumes that you are deploying to staging environment. Some of the steps below will get automated into simpler steps.
- git Clone the code of the sample implementation repository
- Create a file by name secrets.json in the parent directory of the implementation directory like here. Modify the properties as described below:
- serverUrl - the base URL avni server
- clientId - Cognito's client id
- poolId - Cognito's app pool id
- To install node dependencies run from the implementation directory run -
make deps - Each implementation must have at least one implementation administrator. This user is responsible for master data management, modifying forms, etc. This is different from the environment administrator (admin) we created earlier. To create an implementation administrator run -
make deploy-staging-adminUsers - run aws cognito-idp admin-set-user-password --user-pool-id<POOL_ID> --username <ORG_ADMIN_USER> --password <ORG_ADMIN_PASSWORD> --permanent
- run
make deploy-staging-all(you need to have avni-server running when you run this command) - Review and edit (this file)[<https://raw.githubusercontent.com/avniproject/sample-impl/master/create_gender.sql>] and run it.
4. Avni Android App
Avni mobile app build process currently doesn't support more than one instance of it in the play store. There is a plan to make this available, but if you really want it now, we can help you with a hack. Please contact us. Currently, the only option for you is to generate APK from the source code and distribute the APK to your users.
- Clone avni-client from Github (check the Build numbers to find the right branch to pull)
- Use nvm to install node version requires -
nvm installfrom avni-client directory. It would pick up the .nvmrc file to install the correct version. - Install node dependencies -
make deps(this would take some time in installing all the node dependencies) - Modify packages/openchs-android/config/env/staging.json file to provide the server URL.
- From the avni-client folder, perform
make release_staging(Note: the released APK would not use unsecured http connections. If you want to connect to your environment you can usemake run_app_staging). - Perform
make openlocation_apkto find the APK file - To check log output of the avni application, run command -
adb logcat *:S ReactNative:V ReactNativeJS:V
5. Avni Administration Web app
- Download the build.zip file from https://circleci.com/gh/avniproject/avni-webapp/<build_number>#artifacts (to find the build use the similar method as explained in downloading of build for avni-server above)
- (one-time activity) cd /opt/openchs && ln -s /opt/openchs-webapp static
- Extract the contents of the build zip to /opt/openchs-webapp folder (clear the folder completely if you are updating the build)
- The web app is also served by avni server from the root (/)
6. Avni Rules Server (Optional)
- Required if you would like to use the Data Entry App (DEA) interface included in the Web app to manage data for your deployment. This component executes the rules for data entered through the DEA.
- We use pm2 to manage the rules server process but it can be executed without pm2 as well.
- Download the compressed deployable from <https://circleci.com/gh/avniproject/rules-server/><build_number>#artifacts
- Setup 'upload-user' user - Required if you are planning to upload data using the csv upload feature and would like rules to be executed on the data being uploaded.
- Login to the webapp using the super admin credentials
- Go to the 'Admins' menu item and choose the 'Create' option. Create a new user with the username 'upload-user'.
- Provide the
OPENCHS_UPLOAD_USER_USER_NAMEandOPENCHS_UPLOAD_USER_PASSWORDto the rules server process during startup.
- Extract the deployable and execute the following command within the directory to execute the rules server using pm2:
-
OPENCHS_UPLOAD_USER_USER_NAME={{ openchs_upload_user_user_name }} OPENCHS_UPLOAD_USER_PASSWORD={{ openchs_upload_user_password }} TZ={{ avni_tz }} NODE_ENV=production {{ pm2_path }} start app.js --name {{ application_name }} --update-env
pm2 save
-
YOUR SETUP IS COMPLETE !!!
Updated 11 months ago