Release process for the cloud
This outlines the release process for Avni cloud
Avni release process
What is the current deployed release?
The current release on production can be identified through the following mechanisms
- The latest release notes on avni-product
- The latest release blog on the Avni blog
What is the release we are working on?
Releases are marked "Active" on the Roadmap
Release numbering
All versions of below specified end-deployables are marked with a release number that corresponds to the release on the project board, whether they are deployed or not. This makes it easier to understand the right version of the production. For the release, we also mark avni-product with the same release number and provide combined release notes there.
- avni-server
- avni-webapp
- avni-client
- avni-models
- avni-etl
- avni-media
- avni-product
- rules-server
- integration-service
- integration-admin-app
Other smaller packages such as avni-models and rules-config have their own release cycles that do not correspond to anything. We use semantic versioning for these packages.
Any changes if required in avni-infra are done directly on the master branch, the deployment pipeline uses it.
Overview
We have make commands in the makefile that help with releases and ensure that you haven't missed merging ancestors in the release branch and release branch in master.
Release Steps
1. Update Release Configuration
For example, if you are working on releasing 16.3:
- First, update
src/code.tsin avni-product here to include the latest release - Note: If we have already cut the branch for next release make sure to include it as well so that the current release branch gets merged into it. Generally only after the release is done, next branch is cut from master.
2. Create Remote Branches
make create-all-remote-branches-from-mainline
This will create branches on repos where branches did not exist (because no changes were done in those repos).
We still create those branches and release them to maintain consistency across all repositories. This makes it easier to understand the correct version in production as mentioned before.
3. Verify All Branches Exist
make all-branches-exist
Run this as a precautionary measure to reconfirm all branches exist.
4. Check Merge Status
make branch-merge-test
This will tell you what merges are done and what haven't been completed. For example:
- 15.1 is merged into 15.2
- 15.2 is not merged into 15.3
- master is not merged into 15.3
5. Merge Branches
make merge-branches projectName=repoName
repoName can be avni-client for example.
This will go branch by branch asking you to merge or not (y/n). Ideally, it should not ask for branches that are already merged (we can update/fix this later). Since you already know which ones are not merged from
make branch-merge-test, just type 'y' for the ones that need to be merged.
Note on Conflicts:
- If there are any conflicts, you will need to manually fix them
- It will specify if their are conflicts
- At the end, it will say "merge complete/done" although there were conflicts
(we plan to improve this UX/messaging in future) - Once conflicts are resolved, push changes manually
6. Tag Repositories
Once all merging is complete, execute:
make tag-all-repos-with-release-version releaseBranch=15.3 releaseTag=v15.3.0
Important: The release tag should be prefixed with 'v' to avoid branch and tag confusion conflicts in git.
7. Create GitHub Release
- Go to https://github.com/avniproject/avni-product/releases
- Create a new release
- Specify all the changes that are part of this release
- Follow the Release Notes SoP for the format and sources — sections, bullet style, what to include/exclude
7.1. Find Related GitHub Issues
You can find all GitHub issue cards part of this release by executing:
gh project item-list -L 3000 --owner avniproject --format json 2 | jq -c '.items[] | select (.release == "<Specify release number, ex:5.1.0>") | [ .title, .content.url]'Important: The release number must be suffixed with .0. For example:
- ❌ Wrong:
16.3 - ✅ Correct:
16.3.0
8. Backup Latest PROD DB snapshot for long term use
- Find the Latest System Snapshot for Avni PROD DB RDS, and invoke "Copy snapshot" action on it. Name the snapshot "bkp-${Source snapshot name}". Ex: bkp-proddb02-2024-02-13-23-12
Perform Deploys
1. avni-server
- Find the passing circle-ci job for the tag. If the job was triggered more than a week ago, retrigger a fresh build from circleci after selecting the repo and the branch so that the artifacts from the build step are available in the deploy steps.
- Check if there are any running Background jobs on Prod and if needed wait for them to complete
-
select users.username, jobs.* from (select bje.job_execution_id execution_id, bje.status status, bje.exit_code exit_code, bji.job_name "Type of Job", bje.create_time create_time, bje.start_time start_time, bje.end_time end_time, string_agg(case when bjep.parameter_name = 'uuid' then bjep.parameter_value else '' end::text, '') uuid, string_agg(case when bjep.parameter_name = 'fileName' then bjep.parameter_value else '' end::text, '') fileName, sum(case when bjep.parameter_name = 'noOfLines' then CAST(nullif(bjep.parameter_value, '') AS integer) else 0 end) noOfLines, string_agg(case when bjep.parameter_name = 's3Key' then bjep.parameter_value else '' end::text, '') s3Key, sum(case when bjep.parameter_name = 'userId' then CAST(nullif(bjep.parameter_value, '') AS integer) else 0 end) userId, string_agg(case when bjep.parameter_name = 'type' then bjep.parameter_value::text else '' end::text, '') job_type, max(case when bjep.parameter_name = 'startDate' then CAST(nullif(bjep.parameter_value, '') AS timestamp) else null::timestamp end::timestamp) startDate, max(case when bjep.parameter_name = 'endDate' then CAST(nullif(bjep.parameter_value, '') AS timestamp) else null::timestamp end::timestamp) endDate, string_agg(case when bjep.parameter_name = 'subjectTypeUUID' then bjep.parameter_value::text else '' end::text, '') subjectTypeUUID, string_agg(case when bjep.parameter_name = 'programUUID' then bjep.parameter_value::text else '' end::text, '') programUUID, string_agg( case when bjep.parameter_name = 'encounterTypeUUID' then bjep.parameter_value::text else '' end::text, '') encounterTypeUUID, string_agg(case when bjep.parameter_name = 'reportType' then bjep.parameter_value::text else '' end::text, '') reportType, max(bse.read_count) read_count, max(bse.write_count) write_count, max(bse.write_skip_count) write_skip_count from batch_job_execution bje left outer join batch_job_execution_params bjep on bje.job_execution_id = bjep.job_execution_id left outer join batch_step_execution bse on bje.job_execution_id = bse.job_execution_id left join batch_job_instance bji on bji.job_instance_id = bje.job_instance_id group by bje.job_execution_id, bje.status, bje.exit_code, bje.create_time, bje.start_time, bje.end_time, bji.job_name order by bje.create_time desc) jobs join users on users.id = jobs.userId where status in ('STARTING', 'STARTED') and create_time >= now()::date + interval '1m'; - Approve deployment to production
2. avni-webapp
- Find the passing circle-ci job for the release tag. If the job was triggered more than a week ago, retrigger a fresh build from circleci after selecting the repo and the branch so that the artifacts from the build step are available in the deploy steps.
- Approve deployment to production
- Deploy platform translations for all app flavors.
3. rules-server
- Find the passing circle-ci job for the tag.
- Approve deployment to production
4. avni-client
Binaries for avni-client can be generated on the local machine or via circleci(Preferred for Avni Production).
Steps for both are mentioned below.
Local Machine Build
Make sure the following environment variables are set (values available in keeweb) for the flavors that are being built:
<flavor>_KEYSTORE_PASSWORD
<flavor>_KEY_ALIAS
<flavor>_KEY_PASSWORD
- For releasing all flavors:
## Create prod bundles
versionName=3.5.1 versionCode=30501 make release_prod_all_flavors

## Deploy platform translations
make deploy_platform_translations_live_for_all_flavors- To release a particular flavor, say lfe:
## Create prod bundle
versionName=3.5.1 versionCode=30501 make bundle_release_prod flavor='lfe'

## Deploy platform translations
make deploy_platform_translations_for_flavor_live flavor='lfe'- To release security flavor, follow instructions specified here
CircleCI Build
- Go to https://app.circleci.com/pipelines/github/avniproject/avni-client
- Select the branch that the release is being made from
- Click on the 'Trigger Pipeline' button. Note that Trigger can be done only on HEAD of a branch, if you need to build from one of the previous commits, then create a new branch and use that for build purposes. Merge it back to the parent after build.
- In the popup that is opened, add
flavor,versionCodeandversionNameparameters.flavorby default is set togenericand can be skipped if generating the generic avni flavor.
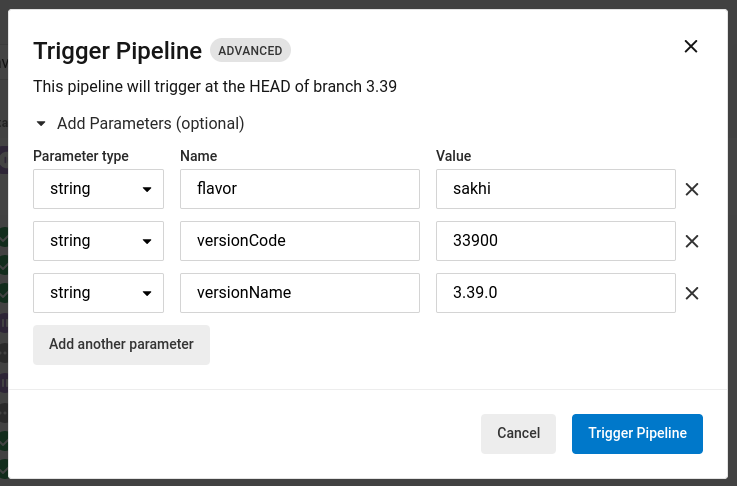
- Click on 'Trigger Pipeline' in the popup.
- Once the test and build jobs pass, approve the hold_live job.
- Trigger platform translation upload for live
## Deploy platform translations make deploy_platform_translations_for_flavor_live flavor='generic' - Once the pipeline completes, AAB and APK files will be available in the artifacts for the release_android_live job. The AAB is meant for uploading to play store. APK can be used for manual testing if required.
- For some reason the AAB downloaded is in
.zipformat. From terminal, do something likemv avni.zip avni.aabbefore uploading it to google play store. - OR, copy the download link for the AAB file and use terminal to download it via wget command (Ex: wget <url>.aab), upload the same to google play store
- For some reason the AAB downloaded is in
- Open the Google Play console
- Open the Avni app and go to Release Menu -> Testing -> Open Testing
- Create a new Beta release and upload AAB generated
- Name the version and provide the release notes. Release notes can be empty.
- Send changes for review
- On Open-testing track, to 100% of users
- On Prod track, partial rollout to 5% of Prod track users
- After we receive Playstore review approval and QA team gives "Go ahead" on performing Sanity testing of Prod APK, manually publish the changes
- Message in the common channel(both team members present) tagging the QA with release notes link, that release is out for sanity testing.
- Wait for 7 days for feedback from users and monitor bugsnag for errors for this version. If none, then increase roll-out to 100% of the production user-base
- If another version needs to be released within 7 days of the previous release, try and release the previous version to a 100% (so that the fixes in it are not held back) instead of superseding it with the new one depending on risk.
Deployment of secondary applications
Avni secondary components are:
- etl
- integration-service
- integration-admin-app
- media-service(Server and client)
For each of the Avni secondary components listed above, repeat the following steps
- Find the passing circle-ci job for the tag corresponding to the release
- Approve deployment to production
Additionally, if there are any changes in Lambda scripts of Avni-media, deploy them to S3.
#> ./deploy-lambda-functions.sh <environment>; // Needs AWS CLI config to be donePost-deployment
- Message in the common channel(both team members present) tagging the QA with release notes link, that release is out for sanity testing.
- Send brief information on
- [email protected], [email protected] (usually with the subject "Avni Release Announcement - release_number")
- avni-community discord channel
- avni-community whatsapp group
- If you are sending this communication for the first check past examples.
- Update dify knowledgebase
- Update README.md from https://github.com/avniplatform/avni-readme/blob/v2.0/README.md
- Update About the Assistant.md from https://github.com/avniproject/avni-ai/blob/main/dify/About%20the%20AI%20Assistant.md
- Update release version in the release tracker
- The platform conductor updates Freshdesk tickets for the released cards — from the release card list already generated in step 7.1, the support-origin cards (they reference the FD ticket number / carry the board's Freshdesk field) each get a note on their ticket that the fix/feature is part of this release (with the release notes link) and are marked Resolved; the support team takes over verification and closure with the organisation from there. The release owner's step here is just to inform the conductor that the release is deployed
- Optional: Create a blog on avni-website repository with details of the release. Make sure to include relevant documentation links and videos if necessary. This is meant for a non-technical user while the release notes on Github can be for developers and implementers
Updated 11 days ago